How to mine Neurai (XNA) — Beginner’s Guide
0 comments
![]()
About Neurai
Neurai, also known by the market ticker XNA, is a layer blockchain with a focus on Internet-of-Things (IoT) and Artificial Intelligence (AI). Let’s delve into more details:
Purpose and Focus:
IoT Integration: Neurai aims to bridge the gap between the world of electronics specialists dedicated to IoT projects and the blockchain ecosystem. It provides a platform to link IoT knowledge with blockchain technology.
AI Integration: By combining blockchain with AI, Neurai seeks to create a synergy that enhances data security, transparency, and efficiency in AI applications.
Technical Aspects:
Layer Blockchain: Neurai operates as a layer 1 blockchain, which means it has its own consensus mechanism and network architecture.
XNA Token: The native token of Neurai is called XNA. It plays a crucial role in the Neurai ecosystem, facilitating transactions, staking, and governance.
Potential Impact:
Neurai’s integration of IoT and AI could lead to innovative use cases, such as secure data sharing, smart contracts for IoT devices, and AI-driven decision-making.
As the project evolves, it may attract developers, researchers, and businesses interested in exploring the intersection of blockchain, IoT, and AI.
Remember, Neurai’s journey is still unfolding, and its impact will depend on adoption, community support, and technological advancements.
Step 1
First you need to create a wallet address for Neurai mining. You can create a Web Wallet or download a Desktop wallet from the official Neurai web portal or by creating a wallet on an exchange that has $XNA coin.
Neurai Web Wallet: Neurai Web
Neurai Desktop Wallet: Neurai Desktop
Exchange Wallet: XeggeX, CoinEX
Step 2
After you need to download the miner software. There are several miner applications which you may use to mine Neurai, for example Team Red Miner (Optimized miner for AMD GPU), NBMiner (AMD and Nvidia), T-Rex (Nvidia) and GMiner (Nvidia) are popular options for XNA mining with GPU and CPU.
Step 3
At the next step we need to open MiningOcean Getting Started pool page and scroll to configuration creation section. Fill in the necessary fields.

Worker_Name is optional, but we do recommend adding this for more efficient mining monitoring. In the Wallet Address enter the address of your wallet created in Step 1. Click Generate configuration.
Step 4
Copy the generated command line string, find the start.bat file or you may want to create your own .bat file, right-click on it, and click edit. Then replace the existing commands with the copied command above. Double-click the start.bat file when you are ready to start mining.
Startup command for Team Red Miner
Create miningocean.bat file and copy / paste example below.
set GPU_MAX_ALLOC_PERCENT=100
set GPU_SINGLE_ALLOC_PERCENT=100
set GPU_MAX_HEAP_SIZE=100
set GPU_USE_SYNC_OBJECTS=1
teamredminer.exe -a kawpow -o stratum+tcp://fr-neurai.miningocean.org:7332 -u YOUR_WALLET_ADDRESS -p YOUR_WORKER_NAME
pause
Startup command for NBMiner
Create miningocean.bat file and copy / paste example below.
nbminer -a kawpow -o stratum+tcp://fr-neurai.miningocean.org:7332 -u YOUR_WALLET_ADDRESS -p YOUR_WORKER_NAME
pause
Startup command for T-Rex
Create miningocean.bat file and copy / paste example below.
t-rex.exe -a kawpow -o stratum+tcp://fr-neurai.miningocean.org:7332 -u YOUR_WALLET_ADDRESS -p YOUR_WORKER_NAME
pause
Startup command for GMiner
Create miningocean.bat file and copy / paste example below.
miner.exe --algo kawpow --server fr-neurai.miningocean.org:7332 --user YOUR_WALLET_ADDRESS --pass YOUR_WORKER_NAME
pause
Mining Neurai with HiveOS
HiveOS is a mining platform which allows users to setup, mine and control processes more effectively and hassle-free across thousands of rigs all from a single place. The advantages of mining on HiveOS is that you can mine using GPU and CPU at the same time.
Step 5
Go to the HiveOS portal and register, afterwards create and customize your mining rig and farm.
Step 6
After that, in the Flight Sheets tab, set up the new configuration by creating your Flight Sheet for Neurai mining. Choose XNA coin, click on Add Wallet and copy your wallet address created in Step 1, choose MiningOcean pool and select NBMiner.
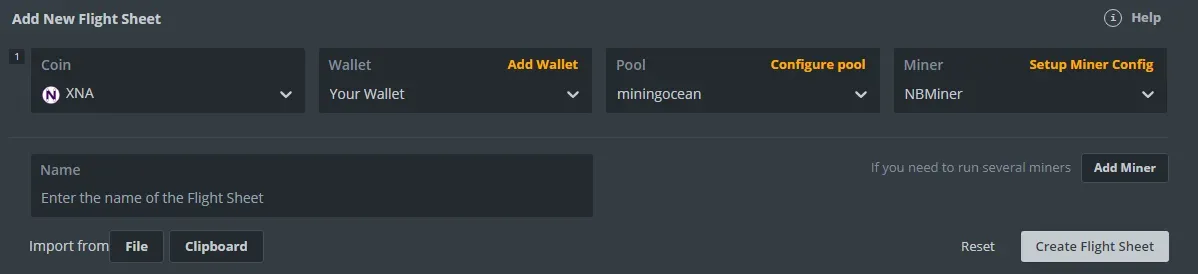
Step 7
Click on Setup Miner Config and configure it as shown below.

Save the settings and run the newly created Flight Sheet.
Comments